昨天加班到深夜,因为今天要演示,慌的一批呀,让别人看出我们封装的意义和价值,当然笔记里没有很详细的说明我们插件的使用的方法
首先这是一个登陆页面,背景图片是有动画效果的,还有一些特效,特效使用react-particles-js插件,需要进行一些配置,当然也可以不用,使用默认的,根据自己的需求来加
<div id="app">
      <ul className="slide-box">
        <li></li>
        <li></li>
        <li></li>
        <li></li>
      </ul>
      <div>
        <Particles
          params={params}
          style={{
            zIndex: '0',
            width: '100%',
            height: '100%',
            position: 'absolute',
            left: '0px',
            top: 0
          }}
        />
      </div>
</div>
//css
.slide-box, .slide-box li {
width: 100%;
height: 100%;
top: 0;
left: 0;
z-index: 0;
}
.slide-box {
position: fixed;
background: #0086b3;
}
.slide-box li:first-child {
background-image: url(/assets/image/bg1.jpg);
}
.slide-box li {
position: absolute;
color: transparent;
background-size: cover;
background-position: 50% 50%;
background-repeat: none;
opacity: 0;
animation: imageAnimation 48s linear 0s infinite;
}
.slide-box, .slide-box li {
width: 100%;
height: 100%;
top: 0;
left: 0;
z-index: 0;
}
.slide-box li:nth-child(2) {
background-image: url(/assets/image/bg2.jpg);
-webkit-animation-delay: 12s;
animation-delay: 12s;
}
.slide-box li:nth-child(3) {
background-image: url(/assets/image/bg3.jpg);
-webkit-animation-delay: 24s;
animation-delay: 24s;
}
.slide-box li:nth-child(4) {
background-image: url(/assets/image/bg4.jpg);
-webkit-animation-delay: 36s;
animation-delay: 36s;
}
@keyframes imageAnimation{
0% {
opacity: 0;
animation-timing-function: ease-in;
}
8% {
opacity: 1;
transform: scale(1.15);
animation-timing-function: ease-out;
}
17% {
opacity: 1;
transform: scale(1.2);
}
25% {
opacity: 0;
transform: scale(1.4);
}
100% {
opacity: 0;
}
}//配置内容
export const polygonParticles = () => {
const params = {
"particles": {
"number": {
"value": 70,
"density": {
"enable": true,
"value_area": 1200
}
},
"color": {
"value": "#6495ED"
},
"shape": {
"type": "circle",
"stroke": {
"width": 0,
"color": "#000000"
},
"polygon": {
"nb_sides": 2
},
"image": {
"src": "img/github.svg",
"width": 1,
"height": 12
}
},
"opacity": {
"value": 0.5,
"random": false,
"anim": {
"enable": false,
"speed": 1,
"opacity_min": 0.1,
"sync": false
}
},
"size": {
"value": 2,
"random": true,
"anim": {
"enable": false,
"speed": 100,
"size_min": 0.1,
"sync": false
}
},
"line_linked": {
"enable": true,
"distance": 300,
"color": "#6495ED",
"opacity": 0.4,
"width": 0.8
},
"move": {
"enable": true,
"speed": 2,
"direction": "none",
"random": false,
"straight": false,
"out_mode": "out",
"bounce": false,
"attract": {
"enable": false,
"rotateX": 600,
"rotateY": 1200
}
}
},
"interactivity": {
"detect_on": "canvas",
"events": {
"onhover": {
"enable": false,
"mode": "repulse"
},
"onclick": {
"enable": true,
"mode": "push"
},
"resize": true
},
"modes": {
"grab": {
"distance": 800,
"line_linked": {
"opacity": 1
}
},
"bubble": {
"distance": 200,
"size": 80,
"duration": 2,
"opacity": 0.8,
"speed": 2
},
"repulse": {
"distance": 200,
"duration": 0.4
},
"push": {
"particles_nb": 1
},
"remove": {
"particles_nb": 1
}
}
},
"retina_detect": true
};
return params;
};接下来是一些功能,可以全屏,可以看到不同的图标,比如点击带有摄像头的图标的时候会弹出右边的内容播放视频,我点击绿色图标是需要弹出对应白色的弹框里面显示对应的信息,拖动地图,白色弹框跟着移动,包括右边栏的东西,表格里面数据的对接,echarts饼图的使用等
1.加载图标
在fnList里面是已经封装好的一些请求接口,参数一样,写法一样,如果每个都写一个await看上去代码非常的冗余,于是我想到了forEach,可是forEach是异步的,它内部也进行了封装,所以使用了for,也可以使用promise.all()
 const loadIconLayer = async () => {
            let total = 0;
            let deviceOffLine = 0;
            let iconLayerList = [];
            // 存放参数为earth的方法
            let fnList = [loadDryBeach, loadReserWaterLevel, loadDisplacement, loadSaturationLine, loadRainfall, loadInclinometer]
            async function requestFn (fnList) {
                for (var i = 0; i < fnList.length; i++) {
                    let res = await fnList[i](earth)
                    iconLayerList.push(res.iconLayer)
                    total += res.total

                }
                clickEvent(iconLayerList, mappanel.current.handleLeft, earth);
            }
            requestFn(fnList)
        }
        loadIconLayer();
}
举一个数组里面方法的例子
// 加载干滩
export const loadDryBeach = async (_earth) => {
    let res = await getDryBeachEquipInfoList({ currentpage: 1, pagesize: 20, datetime: getCurrentTime() });
    let data = transformationCoordinate(res.list, equipment.DRYBEACH); //获取坐标方法
    let dryBeach = new Xt.IconLayer({
        data: data,
        id: d => d.equipno,
        position: d => d.position,
        image: process.env.PUBLIC_URL + '/svg/dryBeach.svg',
        width: 30,
        height: 36
    });
    _earth.layers.add(dryBeach);
    return { iconLayer: dryBeach, total: res.total };
}
// 坐标转换
const transformationCoordinate = (list, type) => {
let data = [];
list.forEach(e => {
let gcj02 = Xt.Math.bd09ToGcj02(Number(e.longitude), Number(e.latitude));
let wgs84 = Xt.Math.gcj02ToWgs84(gcj02[0], gcj02[1]);
wgs84.push(Number(80));
const equipno = e.equipno || e.spbh;
const id = equipno && equipno.substring(0, equipno.length - 4);
// 闲林钼铁矿集团尾矿库监测
if (id === "3301100001" || "3301100120") {
data.push({
position: wgs84, equipno: e.equipno, type: type, equipname: e.equipname
});
}
});
return data;
} //封装的请求方法,使用encrypt加密参数
const getDryBeachEquipInfoList = (obj) => {
let data = {
"username": "zjwkk",
"message": Encrypt({
"tailingno": obj.tailingno,
"currentpage": obj.currentpage,
"pagesize": obj.pagesize,
"datetime": obj.datetime
})
};
return new Promise((resolve, reject) => {
post("/api/Tailings/DryBeachEquipInfo/GetDryBeachEquipInfoList", data).then(res => {
if (res.code === 100000) {
resolve(res.data);
} else {
reject(res);
}
});
});
}通过以上的方法可以吧对应类型的图标放上去主要还是使用的是我们公司封装的Xt.IconLayer
2.全屏
首先在全屏图标上绑定方法
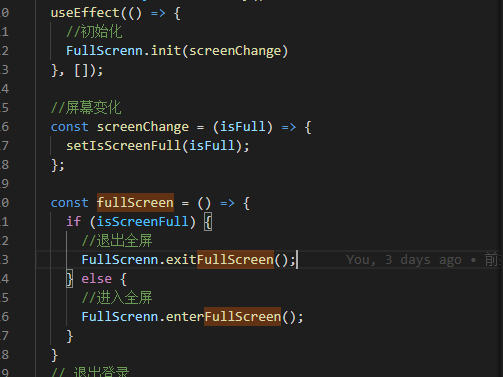
const init = (screenChange) => {

  // 取值17是为了处理页面内容出现滚动条的情况
  let isFull = window.screen.height - window.document.documentElement.clientHeight <= 17;

  // 阻止F11键默认事件,用HTML5全屏API代替
  window.addEventListener('keydown', function (e) {
    e = e || window.event;
    if (e.keyCode === 122 && !isFull) {
      e.preventDefault();
      enterFullScreen();
    }
  });
  //监听窗口变化
  window.onresize = function () {
    isFull = window.screen.height - window.document.documentElement.clientHeight <= 98;
    screenChange(isFull);
  }
};

//进入全屏
const enterFullScreen = () => {
  let el = document.documentElement;
  let rfs = el.requestFullScreen || el.webkitRequestFullScreen || el.mozRequestFullScreen || el.msRequestFullscreen
  if (rfs) { // typeof rfs != "undefined" && rfs
    rfs.call(el)
  } else if (typeof window.ActiveXObject !== 'undefined') {
    // for IE,这里其实就是模拟了按下键盘的F11,使浏览器全屏
    let wscript = new ActiveXObject('WScript.Shell');  //eslint-disable-line
    if (wscript != null) {
      wscript.SendKeys('{F11}')
    }
  }
};


// 退出全屏
const exitFullScreen = () => {
  let el = document;
  let cfs = el.cancelFullScreen || el.mozCancelFullScreen || el.msExitFullscreen || el.webkitExitFullscreen || el.exitFullscreen;
  if (cfs) { // typeof cfs != "undefined" && cfs
    cfs.call(el);
  } else if (typeof window.ActiveXObject !== 'undefined') {
    // for IE,这里和fullScreen相同,模拟按下F11键退出全屏
    let wscript = new ActiveXObject('WScript.Shell'); //eslint-disable-line
    if (wscript != null) {
      wscript.SendKeys('{F11}')
    }
  }
};

export default {
  init,
  enterFullScreen,
  exitFullScreen
}
3.白色弹框随着拖动页面而移动
之前我一位和普通的拖动是一样的,比如mouseenter,mousemove之类,但是我写了之后失效了,因为这是三维的没有效果,要在这个封装的earth里面去使用对应的方法才会生效,主要是这段代码
const earth = new Xt.Earth('earthContainer', {
            destination: [120, 30.2149454, 1e3], //相机初始化位置
            orientation: [0, -90, 0], //相机初始化方向
            globeColor: '#1C1C1C',
            backgroundColor: '#1C1C1C',
            terrain: 'http://47.94.231.113:10086/terrain', //是否开启地形
            operationMode: Xt.Enum.OperationMode.NORMAL,
            sceneMode: Xt.Enum.SceneMode.SCENE3D
        });
const key = earth.render.bind(
                        Xt.Enum.RenderEvent.POST_RENDER, //渲染事件
                        e => {
                            mappanel.current.updatePostion(e.screenCoordinate) //updatePostion是子组件获取的方法,e.screenCoordinate是我点击的屏幕坐标
                        },
                        {
                            target: Xt.Enum.RenderEventTarget.COORDINATE_TRANSFORM, //目标事件
                            params: {
                                position: r.coordinate, //我们把position传给我们的弹框组件
                            }
                        }
                    )
//弹框组件代码,就可以吧x和y赋值给弹框的left和top
useImperativeHandle(cRef, () => ({
updatePostion (position) {
setInitialPos({ x: position[0], y: position[1] })
}
}));4.video
这里视屏播放我是用的videojs插件,使用他的时候src第一次是不能为空的就是不能是undefined或者null因为就算动态的改变的src后面也会不生效,所以把判断放在父组件就可以,判断这个videoInfo是否有信息
const VideoFrequency = (props) => {
  let { videoInfo, isShow } = props
  useEffect(() => {
    var myVideo = videojs('myVideo', {
      sources: [{
        src: videoInfo.hdaddress,
        type: 'application/x-mpegURL'
      }]
    })
    myVideo.play()
  }, [videoInfo])
  return (
    <div className="outerBox" style={{ display: isShow ? 'block' : 'none' }} >
      <h4 style={{ margin: '0px' }}>钼铁矿坝顶视频</h4>
      <video
        id="myVideo"
        className="video-js vjs-default-skin vjs-big-play-centered"
        controls
        preload="auto"
        poster=''
        width="340"
        height="264"
        data-setup="{}"
      >
      </video>
    </div>
  )
}
export default VideoFrequency
一些使用方法(能用css解决就可以不用js)
暂停时显示播放按钮
.vjs-paused .vjs-big-play-button,
.vjs-paused.vjs-has-started .vjs-big-play-button {
    display: block;
}
点击屏幕播放/暂停
.video-js.vjs-playing .vjs-tech {
    pointer-events: auto;
}
进度显示当前播放时间
video.js 默认倒序显示时间,也就是视频播放的剩余时间。
要显示当前的播放时间,以及总共视频时长,加2行CSS解决:
.video-js .vjs-time-control{display:block;}
.video-js .vjs-remaining-time{display: none;}